License: Ultimate-Cloud
Relevant for: Organization owner or Admin
The IDP user provider allows organization owners to create users through an identity provider (IDP) that supports OpenID Connect, such as Microsoft Azure Active Directory. Once configured in my.anydesk II, users can sign in with SSO using their company credentials and the organization's ID.
🦉 For more details on user provider types, see this article.
Prerequisites
Before configuring IDP in my.anydesk II, set up your third-party IDP with OpenID Connect support. You will need the following information from your IDP:
Client secret - used for client authentication. Copy the URL to the Client Secret field when configuring IDP Setup.
.png)
Application (Client ID) - application ID for my.anydesk. Copy and paste the URL into the Client ID field.
.png)
Authorization endpoint - used for initiating login. Copy and paste the URL into the Authentication URL field.
.png)
Token endpoint - used for issuing tokens. Copy and paste the URL into the Token URL field.
.png)
Configure IDP
🚨 IMPORTANTYou cannot edit users created through IDP in my.anydesk II; they are synchronized from the identity provider.
To configure IDP:
Sign in to my.anydesk II and go to Organization.
Under General, click Edit and select IDP as the user provider.
In the Switch active provider window, select Proceed.
Scroll down to the IDP Setup section, click Edit and provide the following information:
Redirect URI - generated automatically when the IDP setup is completed. Copy the Redirect URI value after finishing the setup and paste it to your identity provider.
Client ID - copy the Application (Client ID) value from your IDP and paste it here. It is used to register my.anydesk as an OIDC client with your provider.
Client Secret - copy the Client Secret value from your IDP and paste it here. It is used to register my.anydesk as an OIDC client with your provider.
Token URL - copy the Token endpoint value from your IDP and paste it here. It returns the access tokens, ID tokens, and refreshes tokens to the client (my.anydesk).
Authorization URL - copy the Authorization endpoint value from your IDP and paste it here. It is used for authentication and authorization of my.anydesk client.
Trust Email - turn the toggle off to let users verify their email address via my.anydesk II. Turn the toggle on to disable my.anydesk II email verification.
Backchannel Logout - turn on the toggle to enable the support of backchannel logout by configured IDP. If enabled, the Logout URL field must be provided.
Logout URL - provide the endpoint to log out users from external IDP. Backchannel Logout must be enabled.
Allowed Clock Skew - provide value in seconds (the default value is 0). It determines the acceptable skew when validating IDP tokens.
Default Scopes - the scopes included when requesting authorization. The default is
openid. Provide a comma-separated list of additional scopes you want to request (e.g.,openid,email).Validate Signatures - turn the toggle on to enable signature validation of configured IDP. If enabled, the JWKS URL field must be provided.
JWKS URL - URL where my.anydesk II can retrieve the keys for the configured IDP. Validate Signatures must be enabled.
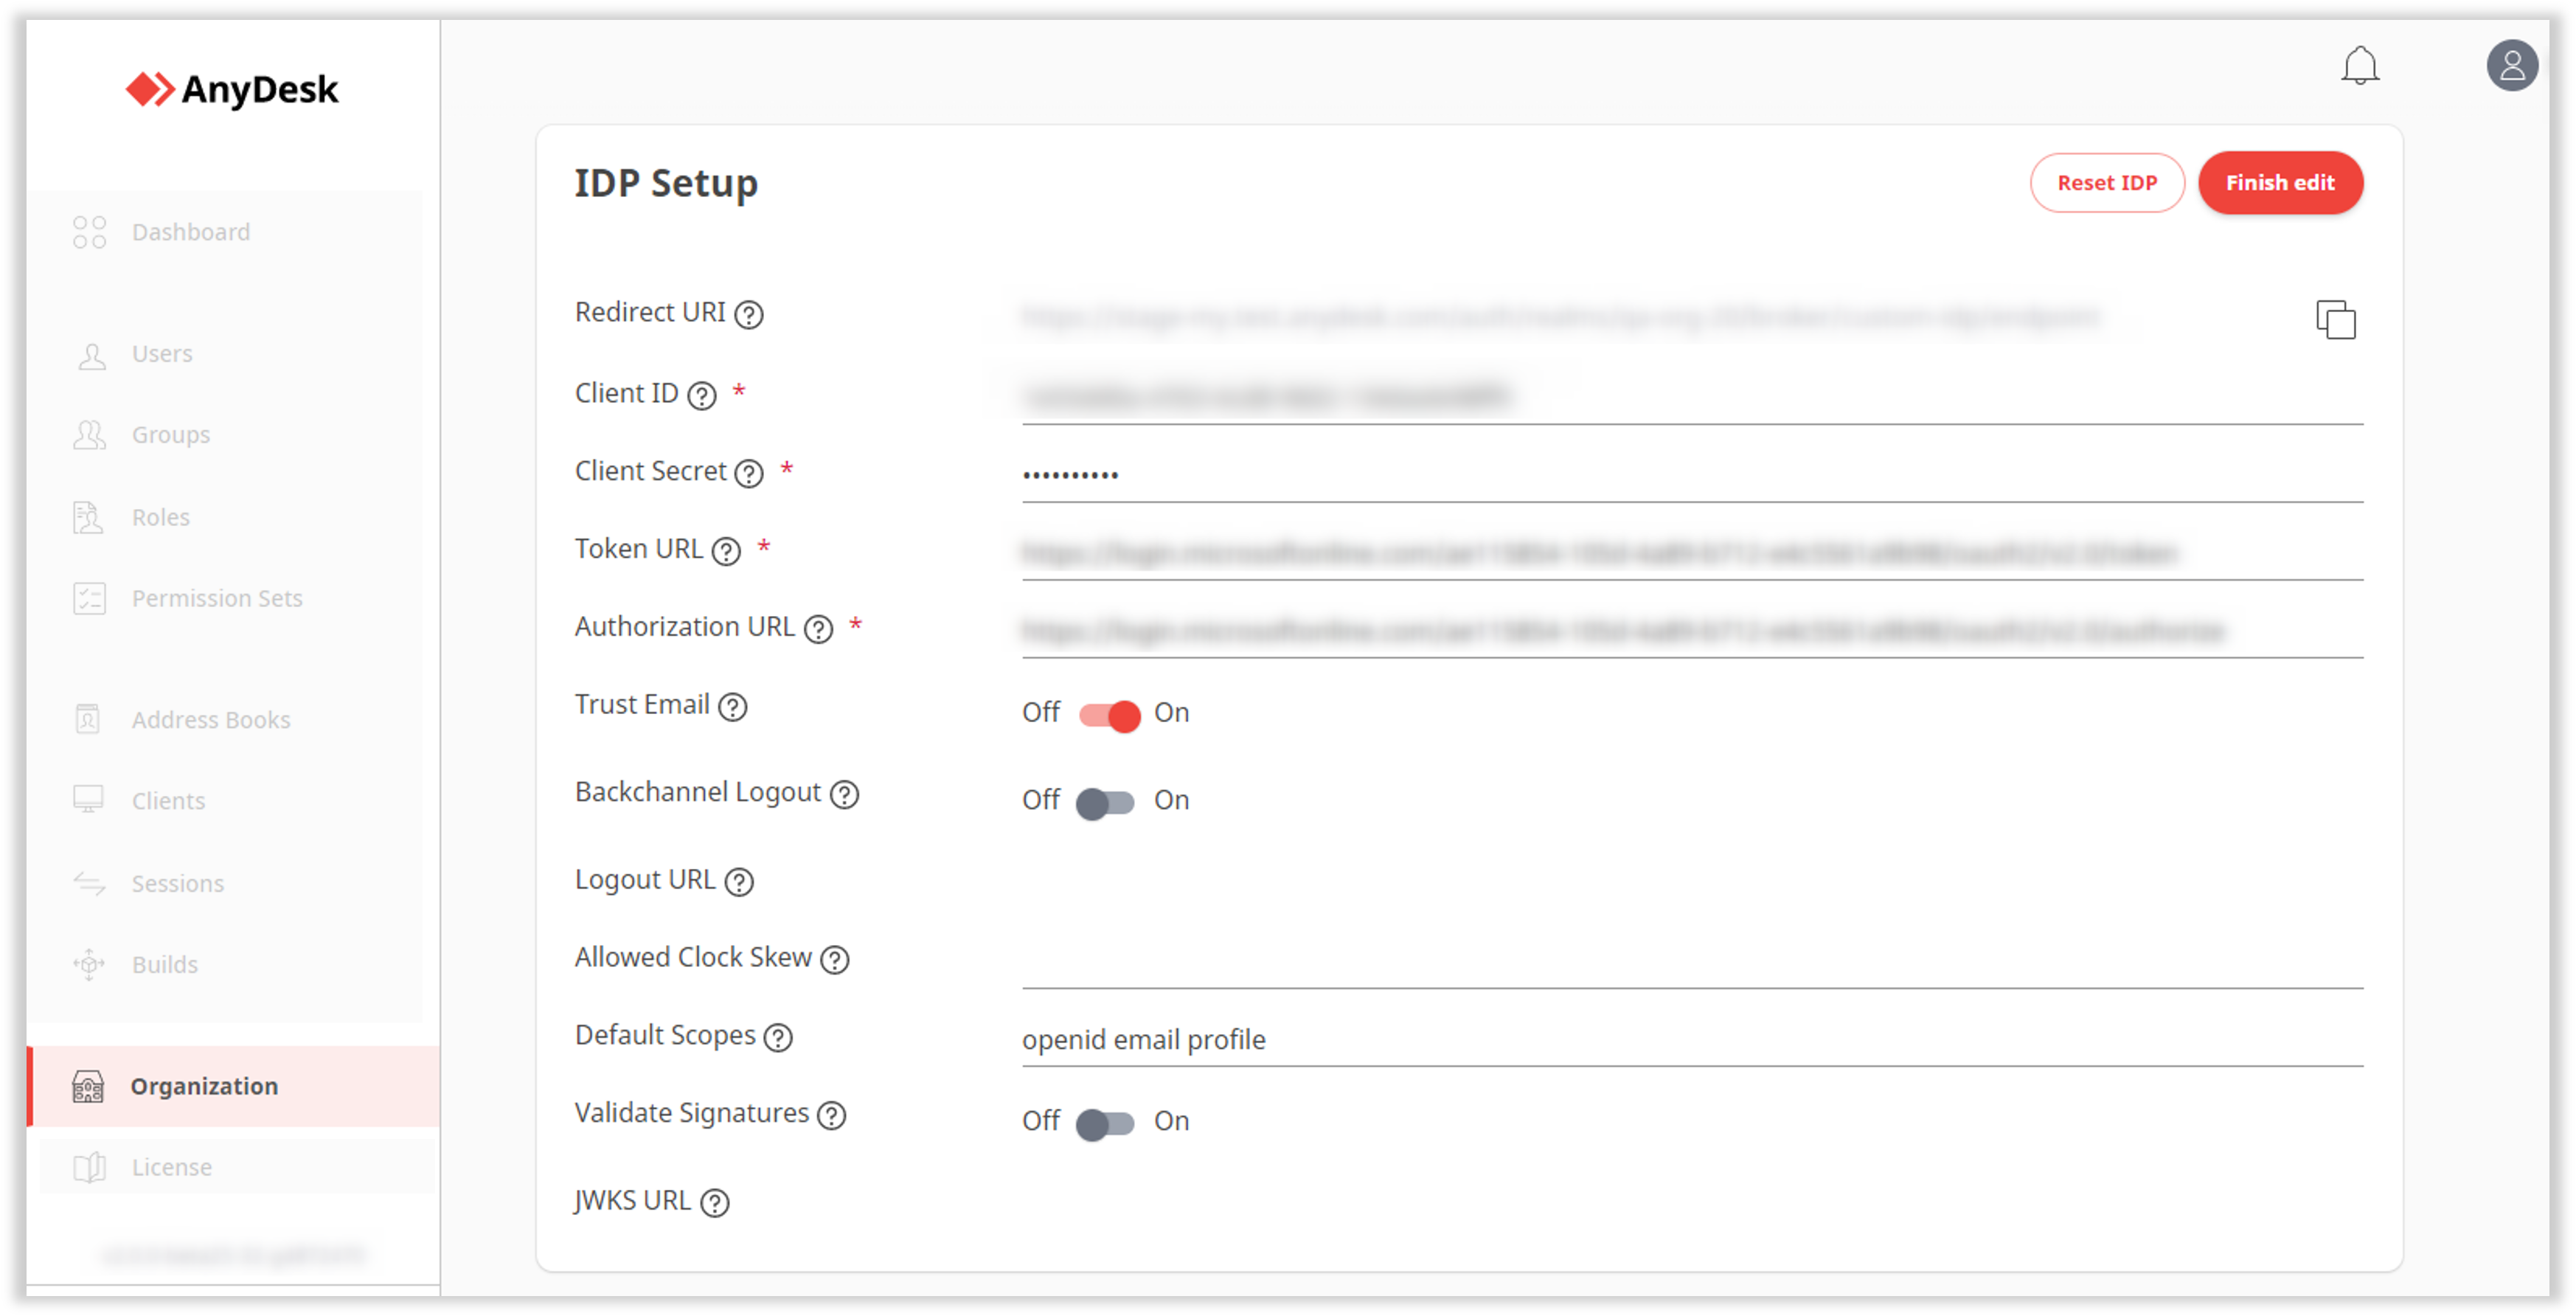
Click Finish edit.
Copy the generated Redirect URI.
Open your identity provider and go to Authentication.
⚠️ Microsoft AzureAD identity provider is used here as an example. Any OpenID Connect-compatible provider can be used.Click Add a platform, select Web and paste the Redirect URI you copied after saving the identity provider in my.anydesk II.
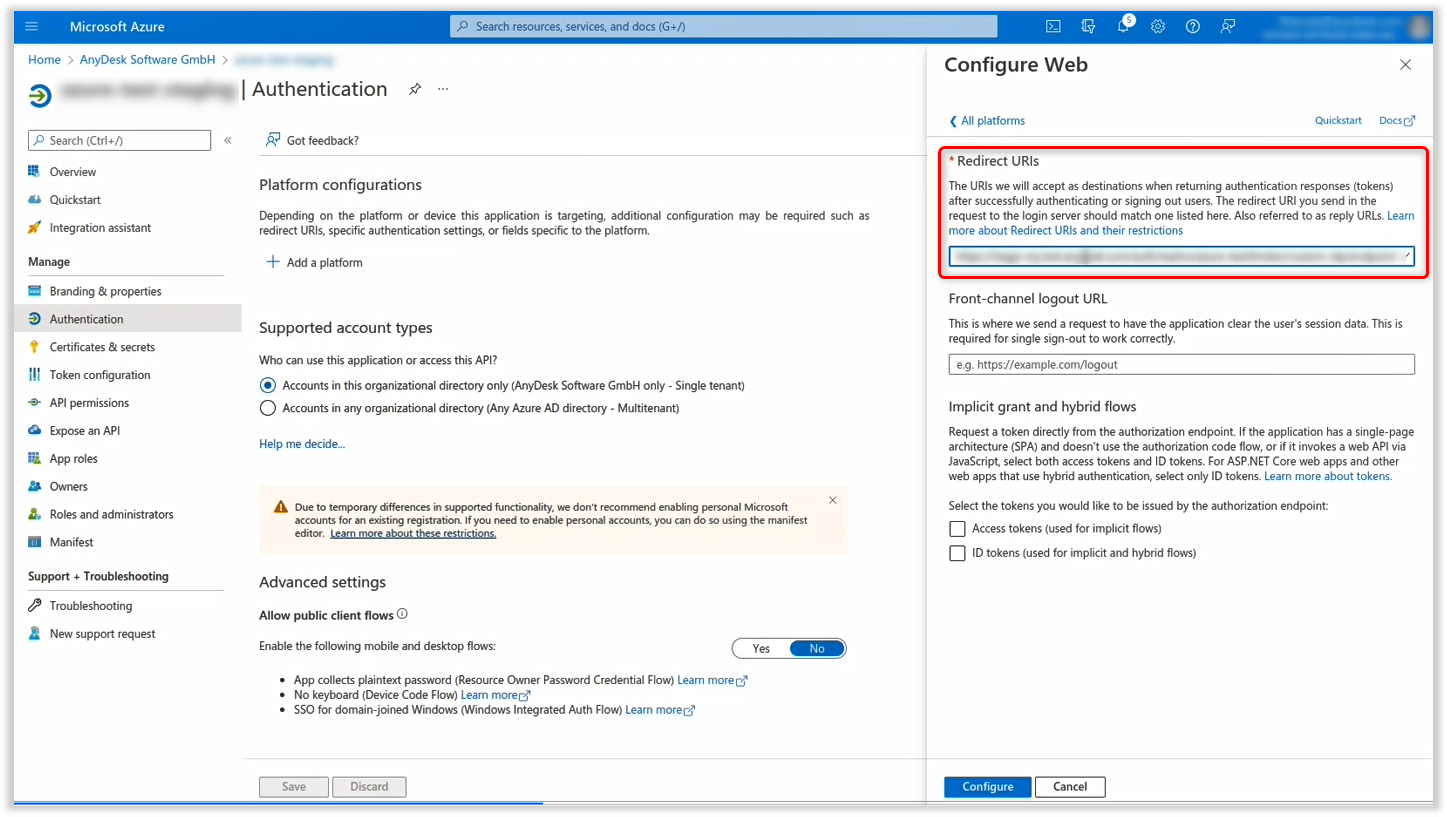
Click Configure.
Once configured, users in your IDP can sign in to my.anydesk II with their company credentials via SSO.
Set up IDP mapper
The IDP mapper allows you to assign roles to users automatically based on IDP attributes. This way, you do not need to assign roles to users manually.
For example, if you want users with the first name John to receive the admin role:
Key:
FirstNameValue:
JohnRole:
admin
These users will inherit the admin role upon logging in.
Requirements:
A group token must be configured in your IDP.
At least one role must already exist in my.anydesk II
To set up the IDP mapper:
In my.anydesk II, go to Organization.
Scroll down to the IDP mapper section, click Create new IDP mapper and provide the following information:
Name - enter the name for the IDP mapper.
Claim - provide the following information:
Key - the IDP attribute name (e.g.,
FirstName).Value - the expected value for the key (e.g.,
John).
Role - select the role from the drop-down list that you wish to assign to the specified IDP user.
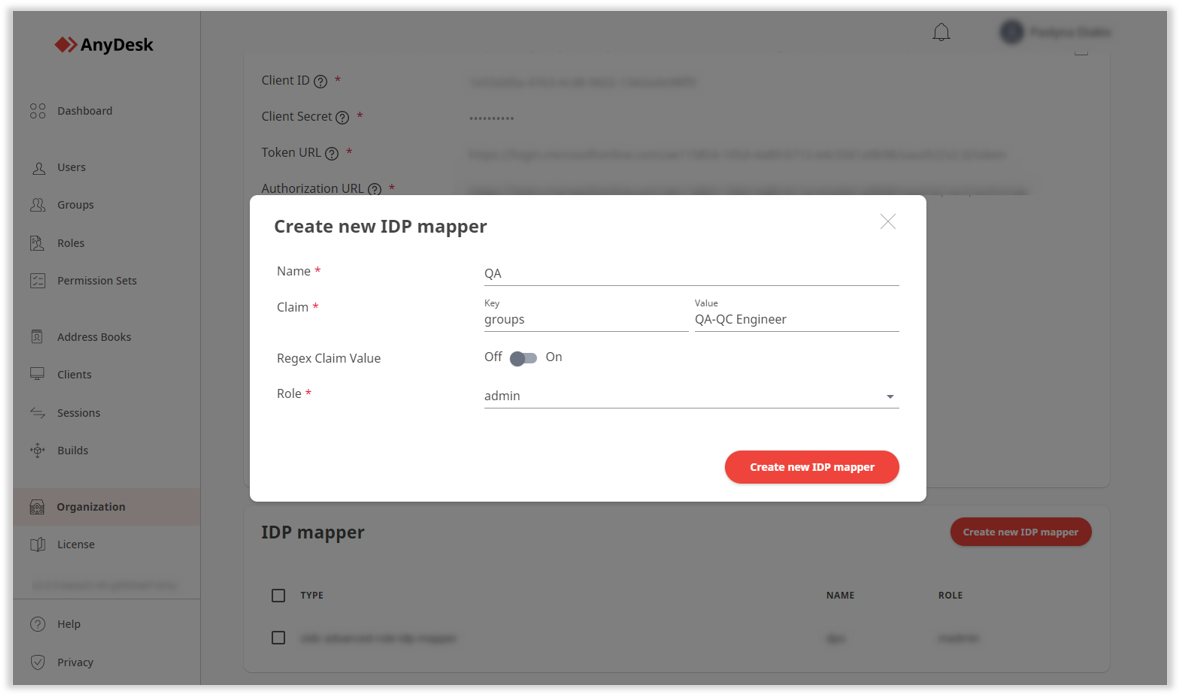
Click Create new IDP mapper.
Once created, users who match the specified claim will be automatically assigned the selected role. Mapped roles cannot be manually assigned until the mapper is deleted.