License: Advanced and Ultimate-Cloud
User roles determine what each user can access within my.anydesk II. Depending on their assigned role, a user may be able to view all features, view and edit them, or have no access at all.
Assigning appropriate roles improves both productivity and security by limiting access to only necessary functionalities.
This article covers the available roles depending on your license and how to manage them.
Roles for Advanced license
License: Advanced
Team roles must be activated before use. Once activated, default roles appear under the User Management page on the Roles tab. Each role defines specific permissions within the management console.
The roles table shows default Advanced‑level roles and their permissions across key sections (Users, Roles, Clients, etc.). For example:
my.anydesk section | Assignable roles | Non-assignable roles | ||||
Admin | DPO | Tech support | User | Owner | Default | |
User Management > Users | View & edit | View only | View only | - | View & edit | View only |
User Management > Roles | View & edit | View only | - | - | View & edit | - |
Address Books | View & edit | View only | View only | - | View & edit | View & edit |
Clients | View & edit | View only | View only | View only | View & edit | View & edit |
Sessions | View & edit | View only | - | - | View & edit | View & edit |
Builds | View & edit | - | - | View only | View & edit | View & edit |
Team | View & edit | View only | - | - | View & edit | View only |
License | View only | View only | - | - | View & edit | View & edit |
Invoice | View only | View only | - | - | View & edit | View & edit |
Admin can edit Users, Roles, Clients, Sessions; Data Protection Officer (DPO) has limited view rights. The Default role is minimal access.
Activating Team roles
To activate Team roles, go to the User Management > Roles tab, click Activate.
All existing users are assigned the User role by default. You can update individual roles later.
🦉 Learn how to assign roles to users in this section.
Deactivating Team roles
You can deactivate Team roles if you do not to use this feature.
To deactivate Team roles, go to the User Management > Roles tab, click Disable feature. Afterward, all users revert to the Default role.
Roles for Ultimate-Cloud license
License: Ultimate-Cloud
With an Ultimate-Cloud license, you can find the default roles in the User Management > Roles tab. Each role has different sets of permissions that define what users can see and do within the management console.
You can view the following roles for the Ultimate-Cloud license:
owner - a role is designed for a license owner. With this role, you get full access to all sections, including deletion of the organization.
admin - a role allows the user to view and edit all the section of the management console apart from License, Invoices, and Personal profile.
support_agent - limited view access to User Management, Groups, Address Books, Clients.
accountant - a role for a person within your organization that deals with invoices. The role grants access to Organization, License, Invoices only.
data_protection_officer - access to most sections except Builds and personal profile
user - the default role for every user. With this role, they can view/edit access to Address Books, Clients, and Sessions sections as well as their personal profile.
Opening any role shows detailed permissions, name, description, role ID, whether the role is mapped from the active directory, its permission sets, and current members.
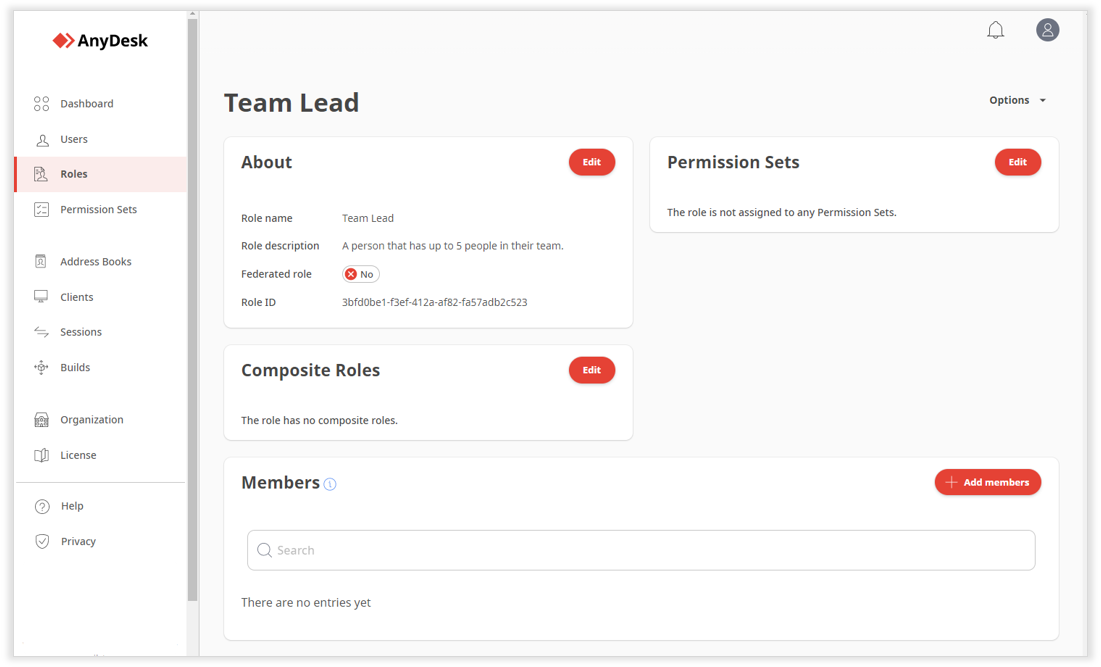
Role overview page for the Ultimate-Cloud license
Manage roles
You can assign roles, create new roles (Ultimate‑Cloud only), and assign permission sets according to your license.
Assign a role to a user
License: Advanced and Ultimate-Cloud
You can assign the role to a user depending on what they need to see and do in the management console.
To assign a role to the user:
In my.anydesk II account, go to User Management > Roles.
Open a role, find the Members section, and click Add members.
Select a user from the list and click Add.
The user now has access to console sections as defined by that role.
Create a new role
License: Ultimate-Cloud
If none of the default roles in my.anydesk II meet your requirements, you can create a new role. After creating the role, assign permission sets to it and add users as needed.
To create a new role:
In my.anydesk II account, go to User Management > Roles.
Click Create role, a enter the role’s name and description.
Click Save role.
Once created, open the role to add permission sets and assign users.
Assign permission set to a new role
License: Ultimate-Cloud
Once you create a role, you need to assign a permission set to it. This way, depending on the permission set that is assigned to a role, a user with that role can either only view, view and edit, or have no access at all to different sections of my.anydesk II.
🚨 IMPORTANTBefore assigning a permission set to a role, you need to first create a permission set. You can also use one of the default permission sets.
To assign a permission set to a role:
In my.anydesk II account, go to User Management > Roles.
Open the role, find the Permission Sets section, and click Edit.
Click Assign Permission Set, and then select one or more permission sets from the list.
Click Submit.
Users with that role now have access levels as defined by the assigned permission sets.