AnyDesk offers a variety of options to transfer files between the local and remote endpoints. This can be done via a "File Manager" session or via "File Transfer" within a remote control session.
File Manager
The dedicated file manager feature is currently available on Windows, macOS, and Linux.
It can run either parallel to an interactive session or through a dedicated File Manager session.
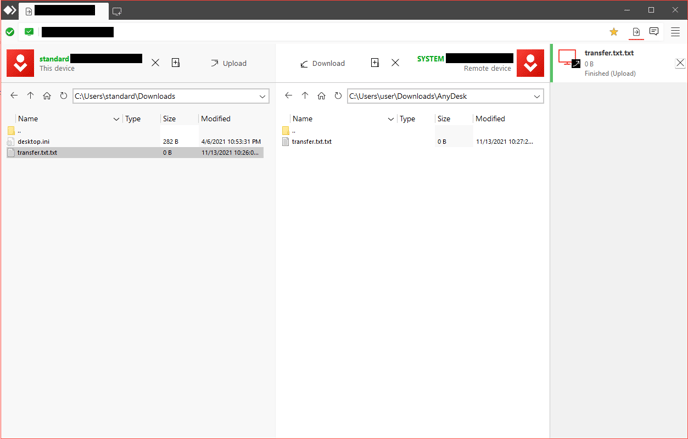
Upload: Transfer the selected files into the corresponding directory
Download: Retrieve selected files from the remote device
This Device: Current directory, always displayed on the left
Remote Device: Current directory of partnering device, always displayed on the right
Directories: "Arrow up" and "Double Dot Folder" (always heading) change to the parent directory
To start a dedicated File Manager session simply click the![]() icon in the "Enter Remote Address" field. Using this mode, the connecting user will only have the ability to transfer files and cannot switch to the graphical user interface of the remote device.
icon in the "Enter Remote Address" field. Using this mode, the connecting user will only have the ability to transfer files and cannot switch to the graphical user interface of the remote device.
Alternatively, you can simply right-click a tile in Favorites, Recent Sessions, Discovery, or the Address Book and select "Browse Files".
To use the File Manager during an interactive remote control session, simply start it up from the AnyDesk Toolbar.
A history of transferred and edited files while in this view can be found in the Accept Window.
File Transfer
AnyDesk provides the ability to synchronize the clipboards between the local and remote endpoints which can apply to both texts as well as files.
This feature is offered through the "copy & paste" functions offered by all major platforms. There are currently two supported methods of doing so using AnyDesk:
- Using hotkeys - For example:
- Selecting one or more files on the remote endpoint,
- using the shortcut CTRL+C to copy the files,
- opening a folder on the local endpoint,
- using the shortcut CTRL+V to transfer the files to the local endpoint.
- Using the context menu - For example:
- Selecting one or more files on the local endpoint,
- right-clicking the selected files and selecting "Copy" to copy the files,
- opening a folder on the remote endpoint,
- right-clicking an empty area in the folder and selecting "Paste" to transfer the files to the local endpoint.
Disable File Transfer
To disable the clipboard transmission, disable:
- “Access my computer's clipboard”
- and "Access my computer's clipboard to transfer files"
in for the profile you wish to disable it for in Settings > Security > Permissions > Permission Profile.
The first option will disable clipboard sync in both directions for both text and files while the second will only disable file transfer using the clipboard.
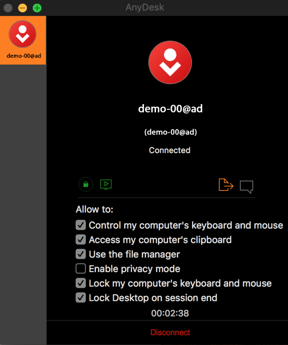
On the remote endpoint, File Transfer can be temporarily enabled or disabled in the Accept Window.
On the local endpoint, File Transfer can be temporarily enabled or disabled in Permissions in the AnyDesk toolbar.
File Transfer with MacOS
When copying one or multiple files to a macOS endpoint, a pending file transfer request will show on the remote endpoint. To access the transferred file(s), click the red file icon in the AnyDesk toolbar or the orange File Transfer icon in the Accept Window and a macOS Finder window will appear with the transferred file(s).
File Transfer with Linux
File Transfer to Linux devices have different behaviors depending on if the Linux device is the local or the remote endpoint.
Local Endpoint
To transfer one or more files from a remote endpoint to a local Linux-based endpoint:
- Copy the files you wish to transfer to the remote endpoint.
- The default File Explorer will appear on the local Linux endpoint with the transferred file(s).
Remote Endpoint
To transfer one or more files from a local endpoint to a remote Linux-based endpoint:
- Copy the files you wish to transfer to the local endpoint.
- Open the Accept Window in the remote Linux endpoint, go to the "File Transfer" tab and click "Accept Files".
- The default File Explorer window will appear on the remote Linux endpoint with the transferred file(s).
File Transfer with Android
Transfer a file from an Android device to a desktop-based platform:
- Session Menu > Actions > Transfer a file to the remote device
- Select a file to transfer
- On the remote desktop-based platform, open the File Explorer and navigate to the desired transfer location
- Right-click the transfer location area and select "Paste"
Transfer a file from a remote desktop-based platform to an Android device:
- On the remote desktop-based platform, use the context menu or a shortcut to copy the file you wish to transfer to the Android device
- Session Menu > Actions > Download a file from the remote device

With AnyDesk 7.0.0 for Android, the File Manager feature was introduced, enabling users to create outgoing File Transfer sessions. To start a File Transfer session, simply enter the AnyDesk address in the Remote Address field, tap the three-dot menu, and select Browse Files.

Similar to desktop platforms, this feature allows you to transfer and manage files and folders between your local Android device and a remote endpoint.

Starting with AnyDesk 7.2.0 for Android, you can also switch seamlessly between interactive and File Manager views via the Session Menu.
For AnyDesk 5.1.0 and newer, file transfer between an iOS and non-iOS operating system is possible.
File transfer to and from tvOS devices is currently not possible.
Transfer a file from an iOS device to a non-iOS device:
- Use the "Share" action on the file you wish to transfer within the Apple File application, select "More" then "AnyDesk".
- As of AnyDesk 5.2.0, this Share to AnyDesk feature is also available in the Apple Photos application.
- AnyDesk will automatically open where you can enter or select the AnyDesk-ID you wish to transfer the file to.
- After the remote computer has accepted the AnyDesk connection, you can navigate to the desired save location and tap the red bar at the bottom to transfer the file.
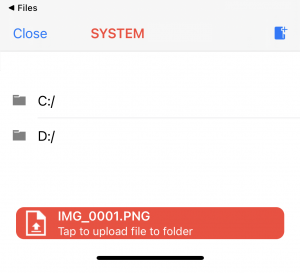
Retrieve a file from a non-iOS device:
- Enter the AnyDesk-ID/Alias of the device you wish to retrieve the file from on the iOS device
- Hold the "Connect" button and a prompt will appear asking if you want to "Connect" regularly or start a File Transfer session.
- Once the remote device has accepted the connection, the iOS device will be transferred to a File Explorer view.
- Select the file you wish to retrieve and tap the red download button at the bottom of the screen.
- Select the location where the downloaded file should be saved on the iOS device.