AnyDesk for Android allows users to both initiate and receive remote desktop sessions across platforms. It supports key features including Unattended Access, clipboard synchronization, and File Transfer.
System requirements
Operating System
Outgoing connections require Android 4.4 or higher.
Incoming connections require Android 5.0 or higher.
Remote control features require Android 7.0 or higher.
Control Plugins
Many Android devices require an additional control plugin to enable full input control. When you launch AnyDesk for the first time, the app will automatically prompt you to install the appropriate plugin based on your device model.
Functionality Limitations: Only remote screen viewing is supported on ChromeOS. Input control is not available due to vendor-imposed restrictions.
Install and set up AnyDesk on Android
Installation
You can install AnyDesk on Android in one of two ways:
Download from an official app store.
AnyDesk is available on the following platforms:Deploy a custom client via the my.anydesk management portal.
Use the my.anydesk II management portal to create a Custom Android Client and deploy it to managed devices.


Control plugins
Android doesn’t allow remote input (such as mouse, keyboard, or touch) by default. As a result, AnyDesk for Android can only view the device screen without allowing interaction.
To enable input control, AnyDesk must receive special input permissions from the system. These permissions are provided via control plugins, which are installed separately.
Control plugins are small add-on applications provided by AnyDesk to enable input control on Android devices.
There are two types of plugins:
Universal plugin (
ad1): Available via the Play Store. This plugin works on many devices and supports input control for most common use cases.Vendor-plugins: Required on some Android devices due to manufacturer restrictions. These plugins are specific to the device model and must be manually downloaded and installed.
To use full remote control features, including input and touch interactions, users must install the appropriate control plugin for their device.
🦉 You can view the list of all available plugins on the Android Control Plugins page.
How to install the correct plugin
Do not manually search for or install a plugin. AnyDesk will detect if the universal plugin (
ad1) is needed and prompt you to install it.If a vendor-plugin is required, you will be redirected to the Android Control Plugins, where you can download and install the correct plugin for your device:
Identify the correct plugin for your device model.
Download the file.
Manually install it (enable unknown sources/untrusted apps, if required).
If a specific plugin is not available
If no vendor-plugin is available for your device, AnyDesk will install the universal plugin (
ad1).This allows basic control only (e.g., mouse movement). Some input types may not be supported.
For full compatibility, contact your device manufacturer to check if a dedicated AnyDesk plugin is supported.
💡 NOTE
If your device uses the generic plugin
ad1and you experience limited control, consider contacting your device manufacturer and requesting support for a dedicated AnyDesk control plugin.
Customize your AnyDesk client
You can create a Custom Client APK to preconfigure, brand, and deploy AnyDesk across managed Android devices. This section outlines how to install the client, handle Android security restrictions, and set a custom package name for enterprise deployment.
Create a custom client
You can create a custom AnyDesk client for Android in my.anydesk II. To create a custom client:
Go to my.anydesk II > Builds > Create build.
In the Custom Client Generator page, select Android as the operating system.
Configure all required settings according to your deployment needs.
Click Create to build the custom APK.
After generation, the APK can be downloaded and deployed via MDM or uploaded to your internal app store.
🦉 You can also either override a setting or change the default setting with Advanced options. Check the key-value pairs in this article.
Set a custom package name
If you're distributing the custom AnyDesk APK via a private app store or device management platform, you may need to use a unique package name.
To configure this:
Go to my.anydesk II > Builds > Create build.
In the Custom Client Generator, enable Android Package Name Suffix.

Enter a suffix that meets the following requirements:
Starts with a letter
Is 3 to 16 characters long
Uses only lowercase Latin letters (no numbers or symbols)
Generate the APK and upload it to your private app store or deployment system.
Install the custom AnyDesk APK
To install a custom AnyDesk APK on an Android device:
Open the device settings and enable installation from unknown sources. Preferably allow this for a file manager app, not a browser.
.png)
Use your file manager or MDM tool to locate the custom APK.
Tap the APK file and follow the on-screen instructions to complete the installation.
⚠️ Menu names may vary depending on the device or Android version.
On Android 14 and some OEM-modified systems, additional restrictions (such as Auto Blocker) may prevent APK installation.
Resolve installation blocks (Android 14 and higher)
Starting with Android 14, Google and some device manufacturers (e.g., Samsung) introduced additional security features that may block APK installations, including custom AnyDesk clients.
If installation fails with the message such as “Unknown app blocked” , follow the steps below based on your device type.
.png)
Open Settings > Security and privacy > Additional security settings.
Tap Auto Blocker.
Disable Auto Blocker.
Retry installing the custom AnyDesk APK.
Open Settings > Security and privacy > Advanced Protection / Device Protection.
⚠️ Menu names may vary slightly by device or Android version.Disable the protection mode.
Retry installing the custom AnyDesk APK.
Grant required permissions
To enable full remote control and functionality, AnyDesk requires several Android system permissions.
Starting with AnyDesk 7.2.0 for Android, a built-in Setup Checklist helps you configure these permissions during initial setup.
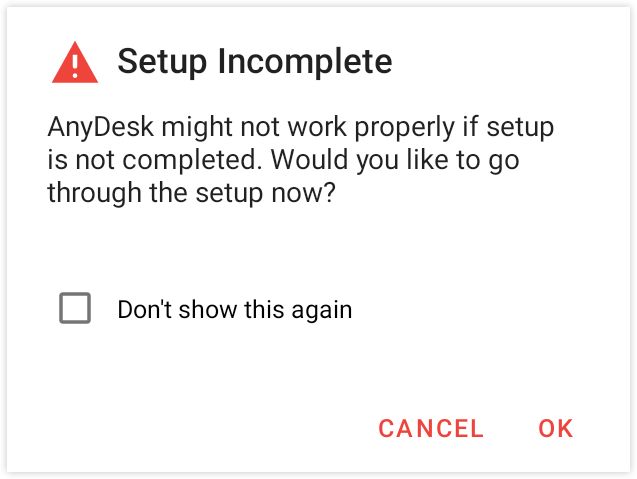
If you dismissed the checklist during setup, you can reopen it anytime from the main window in the AnyDesk app.
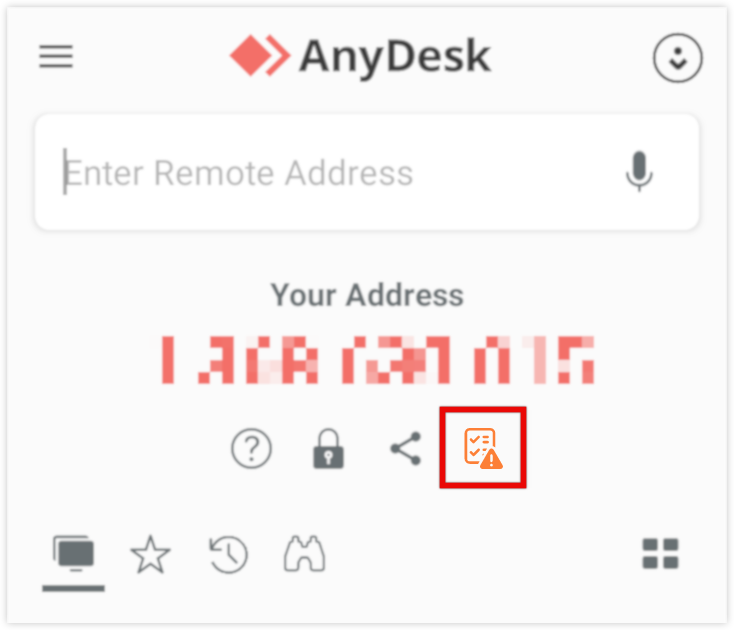
The checklist displays each required permission along with a description of its purpose. Tap any permission entry to view how the permission is used and jump directly to the relevant Android Settings page to grant it.
.png)
.png)
Register your license key
You can register your AnyDesk license on Android in two ways, depending on how the app is deployed and managed.
Register a license by:
This method is recommended for managed or large-scale deployments.
Create or download a custom AnyDesk APK with the Assign to license option enabled.
Install the custom APK on the Android device.
After installation, the app is automatically linked to your license.
You will see an app labeled AnyDesk (Custom), and licensed features will be available immediately.
This method is recommended for individual users or small setups.
Open AnyDesk on the Android device.
Sign in using your AnyDesk account credentials.
Once signed in, the license associated with your account is applied automatically.
This enables licensed features without requiring a custom APK.
Connecting to the Android device
Before connecting to an Android device, make sure the initial setup is complete and any required control plugins are installed. For more details, see Install and set up AnyDesk on Android.
Even if full remote control is not available, unattended file transfers are supported on all Android versions, as they do not require a control plugin.
Connect via Unattended Access
Unattended Access allows you to manage and control remote devices without requiring someone to manually accept each connection request on the remote side.
🦉 For instructions on how to set up Unattended Access, see this article.
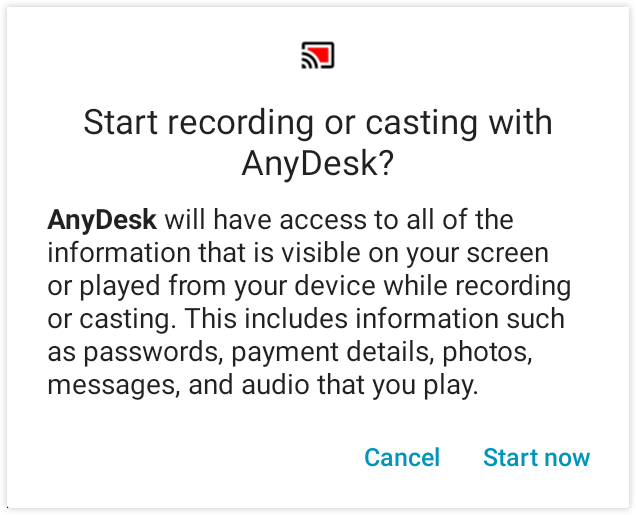
However, on Android 10 and newer, a system-level prompt may appear when starting screen sharing or recording. This prompt is enforced by the Android operating system and in most cases, it must be manually accepted by someone physically present on the Android device, even if Unattended Access has been configured.
To connect via Unattended Access:
Get the remote device's AnyDesk ID or Alias.
On the local device, from which you want to connect to the remote device, enter the AnyDesk ID in the Remote Address field and click
 or press Enter.
 When prompted, enter the Unattended Access password that you previously set up on the remote device.
On the remote Android device, manually accept the system prompt to allow screen recording or casting when it appears.
Once connected, the session starts and the remote device’s screen is displayed. You can now control the device, transfer files, and more.
Control a remote session on Android
During a session, you can access important controls using the Session Menu, also known as the Pie Menu, by long-pressing the AnyDesk logo. You can move the logo by double-tapping and dragging it anywhere on the screen.
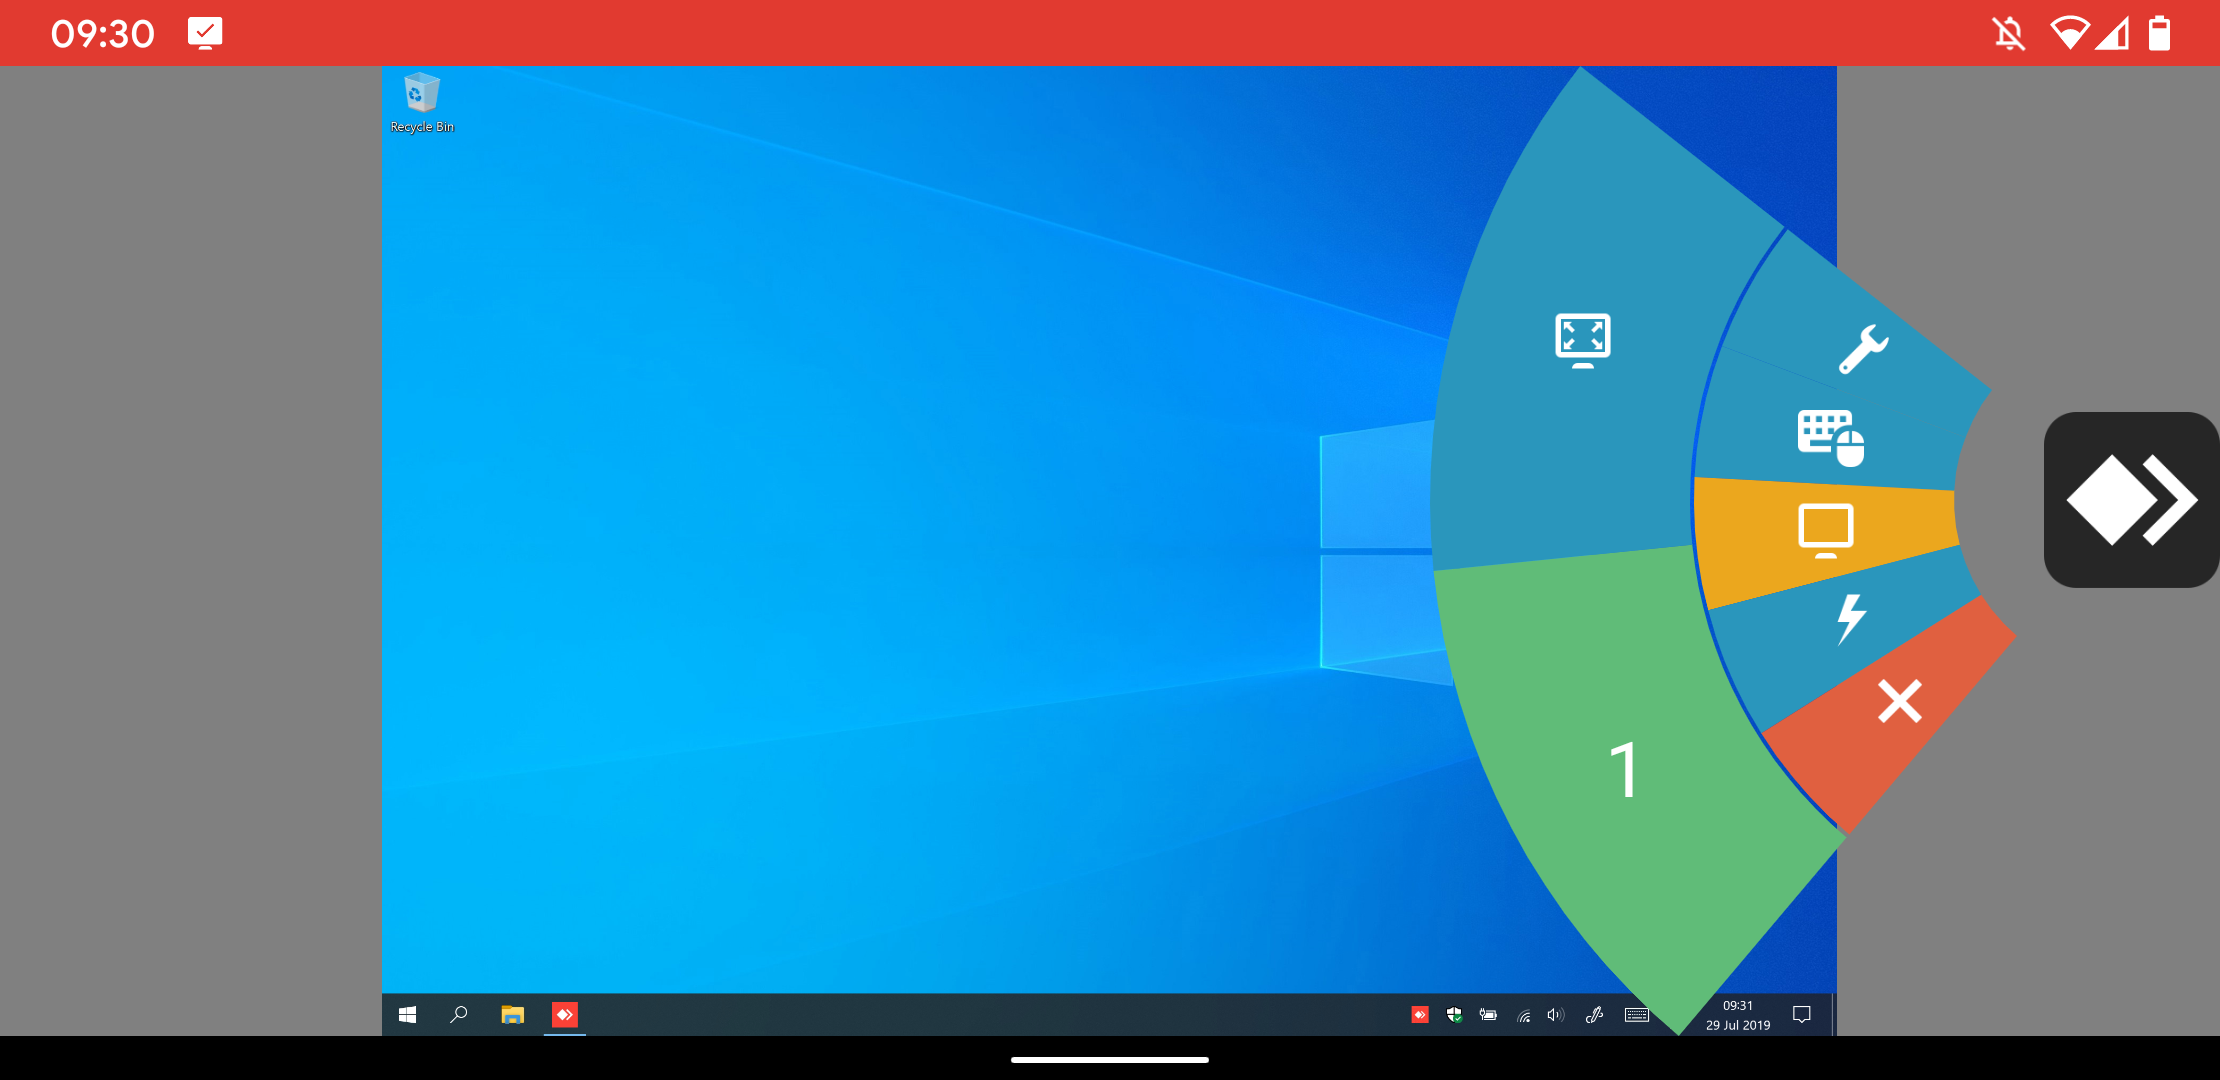
The Session Menu consists of several tiles for:
Settings
Input type
Monitor selection
Actions
Close session
You can use the session menu during the session to:
End the session
Adjust transmission quality
Toggle input control, clipboard sync, privacy screen
Manage audio and display settings
Start/stop VPN or session recording
Send
Ctrl + Alt + Delor request elevation (UAC)Take screenshots
Upload/download files via clipboard
Switch monitors (if the remote device has multiple displays)
Enter/exit fullscreen mode
Change Input type
Open the Session Menu and swipe to the Input tile. You can choose from:
Special keyboard (e.g., F1, Windows key, Tab)
Installed Android keyboard
Automatic keyboard toggle
Input modes | Description |
Mouse mode | emulates a mouse (default for Android to Desktop) |
Touchpad mode | swipes act like a touchpad |
Touch to touch mode | direct interaction (default for Android to Android) |
Translate mouse input to touch input | allows mouse events to simulate touch input |
Supported gestures
When using Mouse or Touchpad mode:
One-finger swipe – move the mouse
Two-finger swipe – zoom
Three-finger swipe – scroll
Tap – left-click
Hold – right-click
Three-finger tap – middle-click
Hotkeys
When connected to an Android device from Windows, you can use keyboard shortcuts for Android system actions.
To use a shortcut, hold Ctrl + Alt + Shift and press one of the following keys, or open the keyboard settings from the Session Menu:
Key | Android action |
F5 | Back |
F6 | Home |
F7 | Recent apps |
F8 | App menu |
F9 | Power |
F11 | Volume down |
F12 | Volume up |
End | OK button |
Main Menu and general Settings
Open the Main Menu by swiping from the left on the start screen or tapping the three-stripe icon.
Settings overview
The Settings menu in AnyDesk for Android is divided into several sections: Application, Security, Session, and Account.
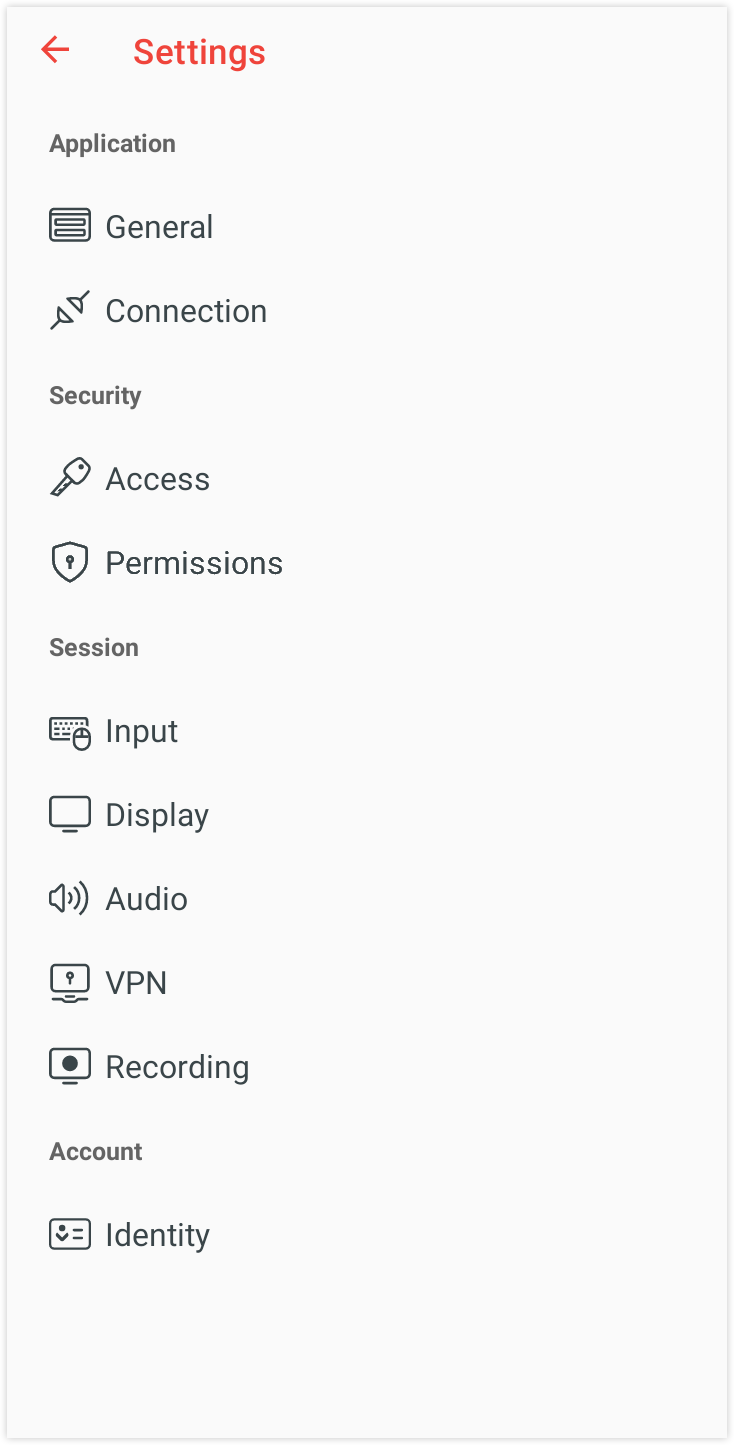
Setting category | Description |
General | Set alias or show ID. |
Connection | Configure proxy settings and connection behavior |
Access | Manage interactive access, Unattended Access, Two-Factor Authentication, and device protection settings. |
Permissions | Control standard Android app permissions such as screen recording, input access, and overlay permissions. |
Input | Choose input modes (Mouse, Touchpad, Touch to Touch), configure the automatic keyboard, and enable keyboard types. |
Display | Set options for showing the remote cursor and choose video quality (e.g., best reaction time, balanced, original). |
Audio | Configure microphone and remote audio transmission. |
VPN | Manage AnyDesk VPN settings if enabled. |
Recording | Enable or disable session recording, including auto-recording options for incoming and outgoing sessions. |
Identity | Set the username and image shown during remote sessions. |
Manage devices with MDM
AnyDesk for Android supports integration with third-party Mobile Device Management (MDM) platforms, such as Microsoft Intune.
MDM support is available starting from AnyDesk version 6.1.10.
Integration is currently supported only with the standard client available on the Google Play Store.
Compatible MDM consoles can detect available AnyDesk configuration options and display descriptions for each supported feature.
Remote control in work profiles
To enable remote control functionality in Android Work Profiles (non-Personal profiles), special configuration is required for the ad1 control plugin. This is due to Android's profile isolation mechanisms.
To pair the ad1 plugin across profiles:
Install the
ad1plugin in the Personal profile.In the Accessibility settings of the Personal profile, enable the plugin.
Open the
ad1plugin app in the Work (non-Personal) profile.In the plugin menu, tap Choose Plugin.
Navigate to the Personal tab and select AD1
⚠️ Label format may vary depending on Android version, especially between Android 8.1 and 10.Accept the configuration request.
Tap OK to initiate the pairing.
💡 NOTE
If pairing fails, try reversing the setup order (start with the Work profile).
Cross-profile communication must be allowed by your MDM configuration.
Devices using manufacturer-specific plugins typically do not require plugin pairing.
Integrate with Android API
AnyDesk provides an Android API that allows basic control and status monitoring, similar to the Windows Command-Line Interface (CLI). This API is intended for use by system-level apps only.
🚨 IMPORTANTAccess to the Android API is restricted to system apps. Full documentation and integration support are available upon request from the AnyDesk Support Team.
Supported API features
The API enables integration with the following features:
Retrieve information
App version
Connection status
AnyDesk ID
Alias
User name
Check status
whether Unattended Access is enabled
whether any incoming session has occurred
whether a custom user image is configured
Set parameters
Unattended access password
Connection behavior
Discovery mode (enabled/disabled)
User name
Custom user image
Troubleshooting
Plugin not activating
Some Android devices require a reboot for the control plugin to function properly.
Control plugin disabled on Android TV
If the Accessibility settings are disabled on an Android TV or Fire TV device, the control plugin for AnyDesk cannot be activated. In this case:
Only Remote View is available - input control is not possible.
This limitation is usually due to manufacturer restrictions.
⚠️ Optional ADB workaround (use at your own discretion):
A possible workaround is to enable the plugin manually using Android Debug Bridge (ADB):
🚨 IMPORTANTThis method uses Android Debug Bridge (ADB) and may affect device security or violate warranty terms. Only use if you understand and accept the risks.
adb shell settings put secure enabled_accessibility_services com.anydesk.adcontrol.ad1/com.anydesk.adcontrol.AccServiceScreen Recording Prompt (Android 10+)
Starting with Android 10, Android requires users to manually confirm a system prompt before apps like AnyDesk can start screen sharing or recording. This behavior is enforced by the operating system and cannot be disabled through app settings, even if Unattended Access is enabled.
⚠️ Optional ADB workaround (use at your own discretion):
In some cases (e.g., enterprise-managed devices), the following ADB shell command can be used to automate confirmation:
🚨 IMPORTANTThis method uses Android Debug Bridge (ADB) and may affect device security or violate warranty terms. Only use if you understand and accept the risks.
Standard Client:
adb shell appops set com.anydesk.anydeskandroid PROJECT_MEDIA allowCustom Client:
adb shell appops set com.anydesk.anydeskandroid.custom PROJECT_MEDIA allow
Android battery optimization
Android includes a feature called Battery Optimization, which is designed to preserve battery life by limiting background activity. However, when enabled for AnyDesk, this feature may interfere with remote sessions by automatically closing the application after 30 to 60 seconds in the background. This behavior disrupts active remote control sessions, resulting in unexpected session termination.
To maintain a stable connection when remotely controlling an Android device, you should exclude AnyDesk and its control plugin from Battery Optimization.
Google Pixel devices
Open the Settings app.
Navigate to Apps > AnyDesk > Battery.
Tap Unrestricted to allow full background activity.
Repeat Steps 2–3 for the AnyDesk plugin.
Motorola devices
Open the Settings app.
Go to Battery > Battery Optimization.
Tap Not optimized and switch to All apps.
Locate AnyDesk, then select Don't optimize.
Repeat Steps 3–4 for the AnyDesk plugin.
General guidelines for other devices
If your Android device differs from the examples provided:
Search for Battery Optimization or App battery usage in the Settings search bar.
Ensure that both AnyDesk and any installed plugin (e.g.,
ad1) are set to Unrestricted or Not optimized.Refer to your device’s user manual or support website for precise instructions.
Send support information (Trace files)
If AnyDesk on your Android device crashes or shows unexpected behavior, you can help our support team investigate by sending Trace Files (support information) along with a detailed description of the issue.
Send trace files via email
On your Android device, open AnyDesk and tap
 .
. Select About AnyDesk > Send Support Information.

Add a detailed description of the issue and tap Send Email.
Retrieve trace files via desktop connection
From a desktop, connect to the Android device using AnyDesk.
Ensure the desktop AnyDesk client has permission to:
Control the device
Access the clipboard
Transfer files
On the Android device, in the Accept window, tap the three-dot menu and then select Send AnyDesk trace file.
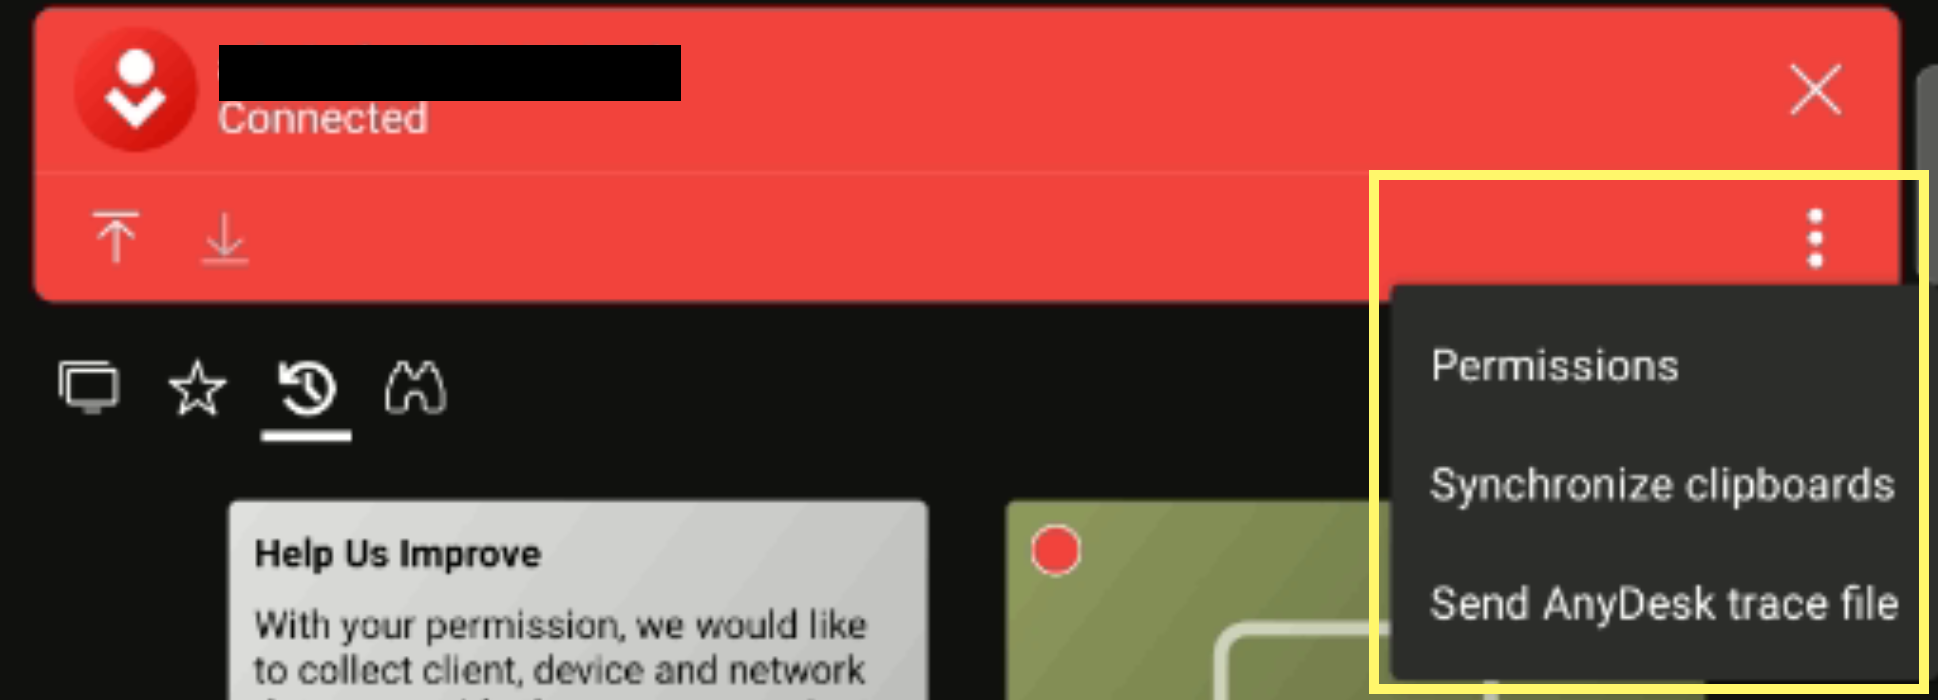
On the desktop, paste the file using Ctrl+V or right-click and select Paste.
View and filter logs locally (Android 7.2.0 and later)
On your Android device, open AnyDesk and tap
. Select About AnyDesk > Open AnyDesk Log.
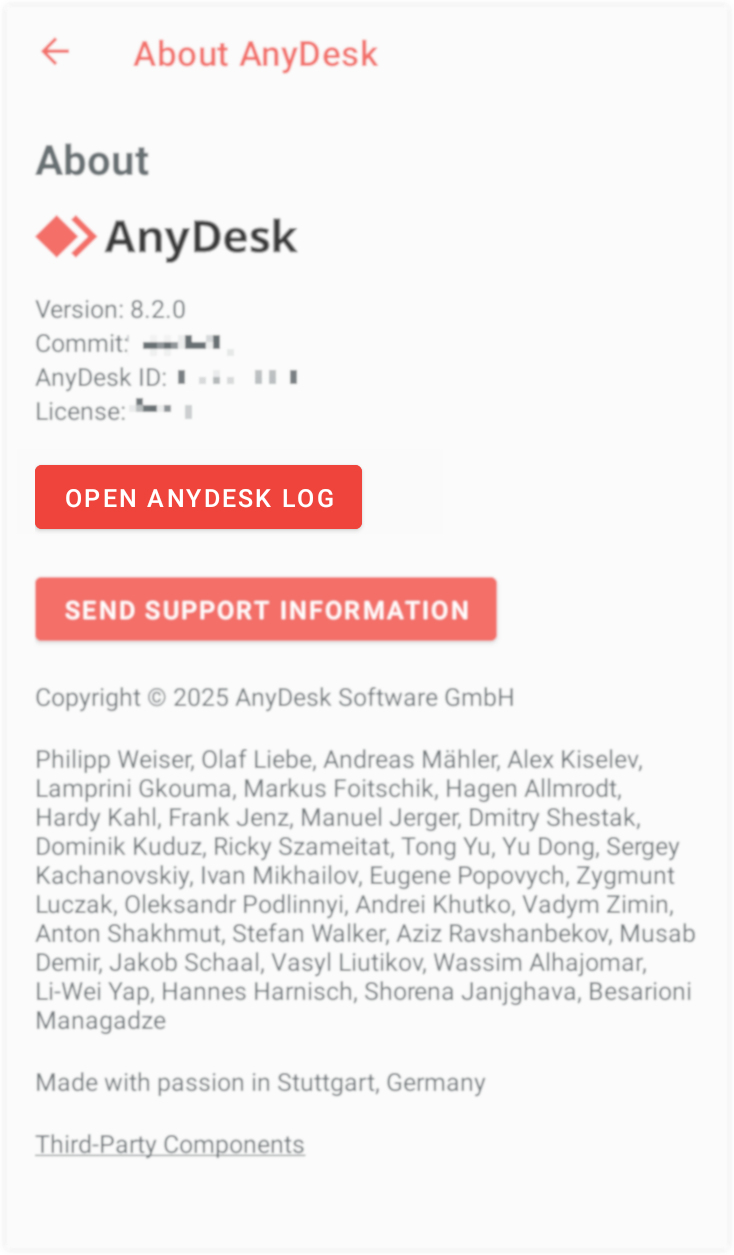
You can filter or copy log entries as needed.