AnyDesk client VS my.anydesk
AnyDesk client
The AnyDesk client is a desktop application that you download and install on your device. It allows you to connect to and control other devices remotely.

my.anydesk
my.anydesk II is the user management portal which offers a wide range of possibilities for users and organizations. With my.anydesk II, you can view session details, create custom clients, create personal or company Address Books, view your license details, invite other users, manage roles and permission for users, and more.

- Set or change Aliases - in the Clients tab, choose a client by their ID to set the Alias.
- Remove clients - in the Clients tab, choose the client by their ID, and on the opened page click Options > Remove client from license. The client will be removed from your license and switched to the free-license version. For details on how to handle AnyDesk access when an employee leaves, see Offboarding.
- View or terminate active sessions - in the Sessions tab, click End (all the sessions will be sorted by the end time).
- Reset the license key to keep unwanted users from registering - open the License tab and click Reset. Already registered clients will stay registered.
Basic setup
Basic setup is recommended for individual users or small companies. To start using AnyDesk, complete the following steps:
- Step 1. Download AnyDesk
- Step 2. Activate your license
- Step 3. Set up Unattended Access
- Step 4. Start a session
Step 1. Download AnyDesk
- Go to our website and download AnyDesk depending on the operating system you use.
- Install AnyDesk on all your devices by following the on-screen instructions.
Step 2. Activate your license
After purchasing an AnyDesk license, you need to activate it in the AnyDesk client to access all the features included with your license.
There are two ways of activating the license:
Your license is linked to your AnyDesk account. Thus, you can log in to your account in the AnyDesk client and activate the license.
To log in to your account in the AnyDesk client:
- Go to your email Inbox and find the email from AnyDesk with account credentials.
- Open the AnyDesk client on your device and in the upper-right corner, click
 .
. - Provide the my.anydesk II credentials sent to your email or the ones you used to create your account.
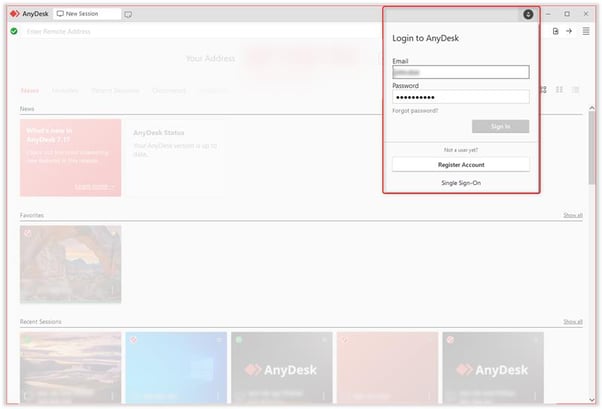
- Click Sign In.
Your license is automatically activated and you can use the AnyDesk client with all features available in your license.
To activate your AnyDesk license:
- Sign in to my.anydesk II using the credentials you received to your email.
- Navigate to the License tab and in the About section, copy the license key.
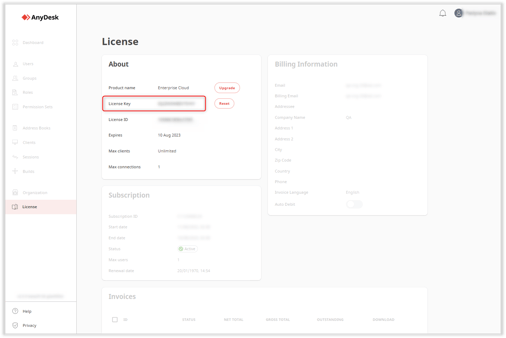
💡 If you use my.anydesk I, find the License key field and copy the license key.
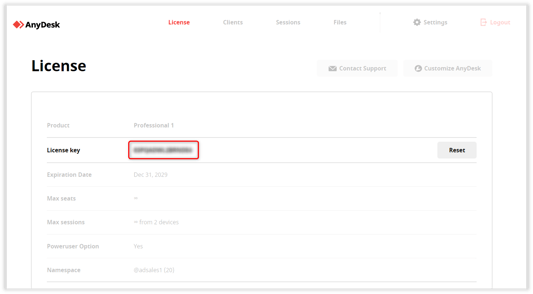
- Open the AnyDesk client on your device.
- In the upper-right corner, click
 > Change License Key....
 - In the Change License Key section, paste the license key from my.anydesk II and click Activate license key.

Your license will be displayed in the Current License section.
💡 To use the full potential of AnyDesk, please license both the local and remote endpoints. For more information, see Professional vs Personal.
💡 If you have signed up for a trial or have purchased AnyDesk but still have not received your my.anydesk login credentials, please refer to our FAQ.
Step 3. Set up Unattended Access
Unattended Access allows you to manage and control remote devices even when no one is physically present at the remote end.
 To enable Unattended Access, set up a password on the remote AnyDesk client. You can then use this password to connect from your local device.
💡 If there will always be someone available to manually accept session requests, you can skip this step.
To set up Unattended Access:
- Open AnyDesk on the remote device.
- Go to Settings > Access and in the Unattended Access section, click Set password.
- Create a password and click Apply.

Step 4. Start a session
- Get the remote device's AnyDesk ID or Alias.

- On the local device, from which you want to connect to the remote device, enter the ID in the Remote Address field and click
 or press Enter.
- In the Authorization pop-up window, provide the Unattended Access password that you set up on the remote device in Step 3.

💡 You can either enter the Unattended Access password to start the session or wait for the user on the remote end to accept the connection manually.
 Session request window on the remote device
To end the session, do one of the following depending on who wants to end the session:
- From your local device, end the session by clicking
 and closing the session tab.
- From the remote device, end the session by clicking Disconnect in the session control window.

Advanced Setup
This section outlines some of the advanced setup options available with AnyDesk.
Custom Client
Through the my.anydesk II management portal, you can use the Custom Client Generator to tailor an AnyDesk client to meet your specific needs. Customize the client’s appearance, name, permissions, security settings, session security, and more, and deploy it across all devices.
Here are some of the configuration options available:
- Configure the AnyDesk client to be incoming-only or outgoing-only
- Set a predefined Unattended Access password for the custom client
- Upload a custom or company logo
- Disable specific features or settings (see Custom Client Advanced Options)
- Enable Request elevation at startup to run AnyDesk with Administrator privileges
- Disable the TCP listen port to prevent firewall warnings on systems without Administrator rights
- Register the client to your license
- Add the client to your Address Book
- Use the device hostname as an Alias
💡 For more information about Custom Clients, see this page.
REST-API
Our REST-API provides an interface to integrate AnyDesk with CRM or ERP systems. The primary use case is to automate the internal billing process using session data. Most features related to client and session management available on my.anydesk are also accessible through our REST-API.![]()
Deployment
AnyDesk can be deployed using device management tools or batch scripts. Additionally, AnyDesk offers command-line interface commands for Windows, macOS, and Linux.
If you have any questions about deploying AnyDesk, please don't hesitate to contact our Support team via the my.anydesk management portal.
🚨 Although we provide MSI and PKG installer packages through the custom client generator, AnyDesk does not support deploying these packages using third-party device management tools. For instructions on deploying third-party packages, please contact the vendors of these services directly.